Tuesday, November 1, 2011

Photography Crafts

I've been sadly lacking in time spent in my craft room and this week looks like it will be no better as I'm in the planning stages of a project.

But in the meantime I didn't want to not post all week, so I thought I'd share a few fun "Picnik-ed" photos.  I love taking pictures of nature and I also love tweaking/editing photos.  As I have not splurged for Photoshop yet, Picnik has been and absolutely awesome awesome find for me.  Though I do want to splurge for the "Premium" version too, I'm making do pretty well with the free features.  My favorite features are definitely Cross Process, 60's effect, Vignette & rounded corners.

Anyway, here are a few photos I edited with Picnik.  (And I'm most definitely not being compensated at all for this post about Picnik, I really truly just love it)


Linked up at

Crayon Freckles

Sunday, October 30, 2011

Fall Fest Pumpkin Cake

I saw a pumpkin cake done two different ways on Pinterest and decided it was a really really cute idea to make for this years Fall Fest cake walk at church.  I love decorating yummy and cute cakes, though I'm pretty amateur yet.

Here is one of the Pinterest Pins that gave me the inspiration:

Original Source

First of all, I didn't even have a bundt pan to begin this, but when I called my sister she just happened to be at Goodwill, where she found this pan for 49 cents!!!


Before you look at the next picture, I have to confess, I don't always make homemade cakes.  Often when I'm working on a cake for an event (like a birthday, graduation, or something like this) I use a box mix and doctor it by adding a box of pudding and/or buttermilk powder or other spices.  Some may argue it doesn't take much more time to make a homemade cake, but so far I haven't found a perfect go to base cake that doesn't take long and "always" turns out.  Box mixes seldom fail.  So for this one I did use box mixes. 

Starting Supplies
I had two yellow mixes and one devil's food.  I also needed to make some cupcakes for a trick or treat gathering at my sister in laws so I decided to go with one half of the pumpkin being chocolate and half being yellow so that I could use the second yellow mix to make pumpkin spice cupcakes.  

So I mixed up each of the mixes and made two seperate bundt cakes.  While the cakes were baking I made Pumpkin Spice Buttercream frosting (this was homemade!).  The recipe I used as a "guideline" is Wilton's Buttercream.   I doubled this recipe as I had a cake and 2.5 dozen cupcakes I would be frosting.  I didn't sift my powdered sugar and I didn't use clear vanilla.  I used Atecco food coloring gel to make a peachish/orange color and then a light brown for the stem.  I also added pumpkin pie spice to most of the frosting.

When the cakes were finished baking and had cooled I trimmed the tops.


I picked up a cute fall plate at the Dollar Tree that I used as a base for the cake.


I put the bottom cake on the plate "upside down" and then the second cake on the top.


My original idea was smooth frosting that would show off the "ridges" of the pumpkin.  I started with a crumb coat.  I love crumb coats (frosting a cake with a really thin layer of frosting and then refrigerating it for a little while to trap your crumbs) .  It was always really frustrating to have all the icky crumbs spoiling my frosting job and one day I was reading some decorating tips and thought, hmm I should try that.  Now I swear by it.  My sister prefers to just freeze her cakes before frosting but that's not usually possible for me as I'm often baking and frosting the same day.


While applying the crumb coat I realized I was not going to get the smooth look I wanted, at least not with the  short time I was working with (it was probably 10:30 pm at this point).  So in the end I went with a "swirly" look.

For the stem I made a really small batch of rice crispy treat and using the bundt pan formed a stem that would sit on top of the hole in the middle.  For the leafy decoration I melted some white baking chips and used some (Atecco) food coloring and a Wilton Icing bag to pipe it on.  (sorry  no pictures of those steps, I was really rushing to try to get to bed before it got too late at that point).


I think it turned out pretty cute even though it wasn't exactly how I originally envisioned it.  I sure hope the cake walk winners enjoyed it as much as I did!


Linked up at:

I Heart Naptime Sundae Scoop

Made by You  Monday's at Skip to My Lou

Tuesday, October 25, 2011

Bookmark Card


A few weeks ago I made this cute bookmark card for a birthday.  It's nice to send a card that has a little something special that can be useful, especially if you know any readers.  It would also be great paired with a good book for a gift.

 Since I made this before I started my blog I made another one with the same bookmark idea to post tonight.

Here are the supplies I started with although they are not exclusive because as I was creating I grabbed a few other things.  PS the cupcake stamps and the bird stamps in the first picture are Inkadinkado's Cling Stamps and they are so cute!  I also saw the cutest fish from the same line that might have to become part of my collection very soon!

So I stamped my bookmark, punched a hole and added brown ribbon. Then I decided to also trim the edges with my deckle scissors.  (I deckle almost everything :) )

Next I trimmed down my pretty paper to the right size.  


After playing around with positioning and also re-trimming a little I finally settled on this angle and glued it down with a glue roller.

I lined up my bookmark and ruler and then made a slit wide enough for the bookmark to slide through.  Make sure you have your card laid out flat so you don't slit the back page of the card and be careful when cutting.

I repeated the cutting step with the top, only I placed the bookmark in the bottom slot and then ended up sliding it down to just above where I wanted to cut the slit making it more likely that I'd line up the slits well!


On the inside I just made a little handwritten note to let the recipient know it was meant to come out and tucked the ribbon in.  Of course in the very first photo I used the ribbon as part of the card.  There are tons of different ways to customize this card from what you put on the bookmark to how you display it in the card.

Front of finished bookmark card.
Linked up at:


Laugh, Love, & Craft


Photobucket


Clean & Scentsible


I Heart Naptime Sunday Scoop

Friday, October 21, 2011

Food "Crafts": Multi Grain Bread

{Adapted from this Planner Perfect Meals post & an article in Countryside Magazine}

A few months ago I made my very first homemade hand kneaded bread.  I've made bread in a bread maker, and I've made "no knead" breads too, all with pretty good success.  But after reading an article in Countryside  Magazine (see above link) I decided to try it out.  It's a fair amount of work (although there are recipes that take less work than the Countryside article), but it turned out pretty darn good.  But as it turned out it was a little too much work for me to do on an absolute regular basis.  However, when I came accross the Planner Perfect Meal recipe, I was inspired to try it out.  With adaptations... and combining steps from the two breads, it turned out pretty darn awesome.  At least the Husband & I think so.


1 1/4 cups 7 grain cereal 
2 1/2 cups boiling water 

4 tbsp. honey
4 tbsp. melted butter 
2 1/2 tsp. yeast 

4 1/2 cups flour (combo of all purpose & wheat, though I imagine you could use all white or all wheat)
1/2 tbsp  to 1 tbsp. salt 
3/4 cup unsalted pumpkin or sunflower seeds
additional butter for coating bowl/bread
 rolled oats or quick oats


  • Place cereal in your mixing bowl.  (you will be adding bowling water so I recommend a sturdy bowl) I recommend using a stand mixer with a dough hook  to start with at least, it saves you some kneading.  
  • Boil water and then add to cereal mixture, stir and let cool until it is 100 degrees F or cooler.  
  • Mix together  flour & salt. 
  •  Activate yeast by warming a couple tablespoons of water to about 100 degrees F adding the yeast and leaving it sit for a few minutes. (possibly an unnecessary step but I do it anyway)
  • Add honey, melted butter and yeast to the cereal mixture when it is the right temp and stir.  
  • Add flour mixture to cereal mixture while stand mixer is on a low speed kneading.  
  • Continue adding flour and kneading until dough ball forms.  
  • Once dough ball forms continue kneading in stand mixer for about 10-15 minutes or at this point you could remove dough ball from mixer bowl onto lightly floured surface or into a bigger bowl to do the 10- 15 minutes of kneading.  
  • If you are adding any seeds to your bread (hand) knead them in at this time as well.  
  • Grease bowl lightly with butter and turn dough once to lightly coat dough ball with butter.
  • Place on counter or table uncovered for a "long cool" rise between 1 hour & 1.5 hours. (dough should be doubled at this point) 
  • Punch down (aka flatten) dough and allow to rise a second time for about 45 minutes to 1.25 hours. (again dough should double in size)
  • During this second rise grease or spray two 9x5 loaf pans
  • When second rise is complete, remove from bowl and shape into two "logs" rub with butter and roll in oats.
  • Turn oven on to 350 degrees F.
  • Place loaves in pans and allow to rise another 30 - 50 minutes (again until doubled in size).  
  • Bake for 30 - 40 minutes.  
  • Cool for just a few minutes in pan then remove to wire rack.  
  • Enjoy!


Okay so some "notes" about this recipe...  First of all I failed at finding the correct 7 grain mixture and ended up using Bob's Red Mill Muesli and picking out most of the dried fruit and then putting it in the food processor to make the dried fruit that I missed, smaller (the muesli already had sunflower seeds in it so I got to skip the kneading in of the seeds).   
Second, (and I know there might be some cringes on this- but) I used margarine.  
Also I used 1/2 tbsp salt though the original recipe (both of them actually) called for more salt.  
And for flour I used more wheat than white, though I can't tell you my exact ratios. I actually used fine wheat flour, all purpose flour and a minor amount of course wheat flour.  
And really the bread was awesome even with all the odd tweaks.    I'm one of those bread bakers that will cut into it when it's just cool enough to cut a piece off.  I had to restrain myself from eating the whole loaf!  
  

Wednesday, October 19, 2011

Felt Flower Clip and a Necklace


I just love all the make it yourself fabric and paper flowers out there, they are just so amazing and cute.  My first ever attempt was these rolled fabric flowers.  
The tutorial I followed was from this Little Birdie Secrets  post.  

Then I made some tulle flowers.... the kind where you cut circles and then melt the edges over a candle.  I added three fake pearls in the centers of all of these tulle flowers I've made so far.  I use a couple strands of embroidery thread.  This is the YouTube video I adapted them from.

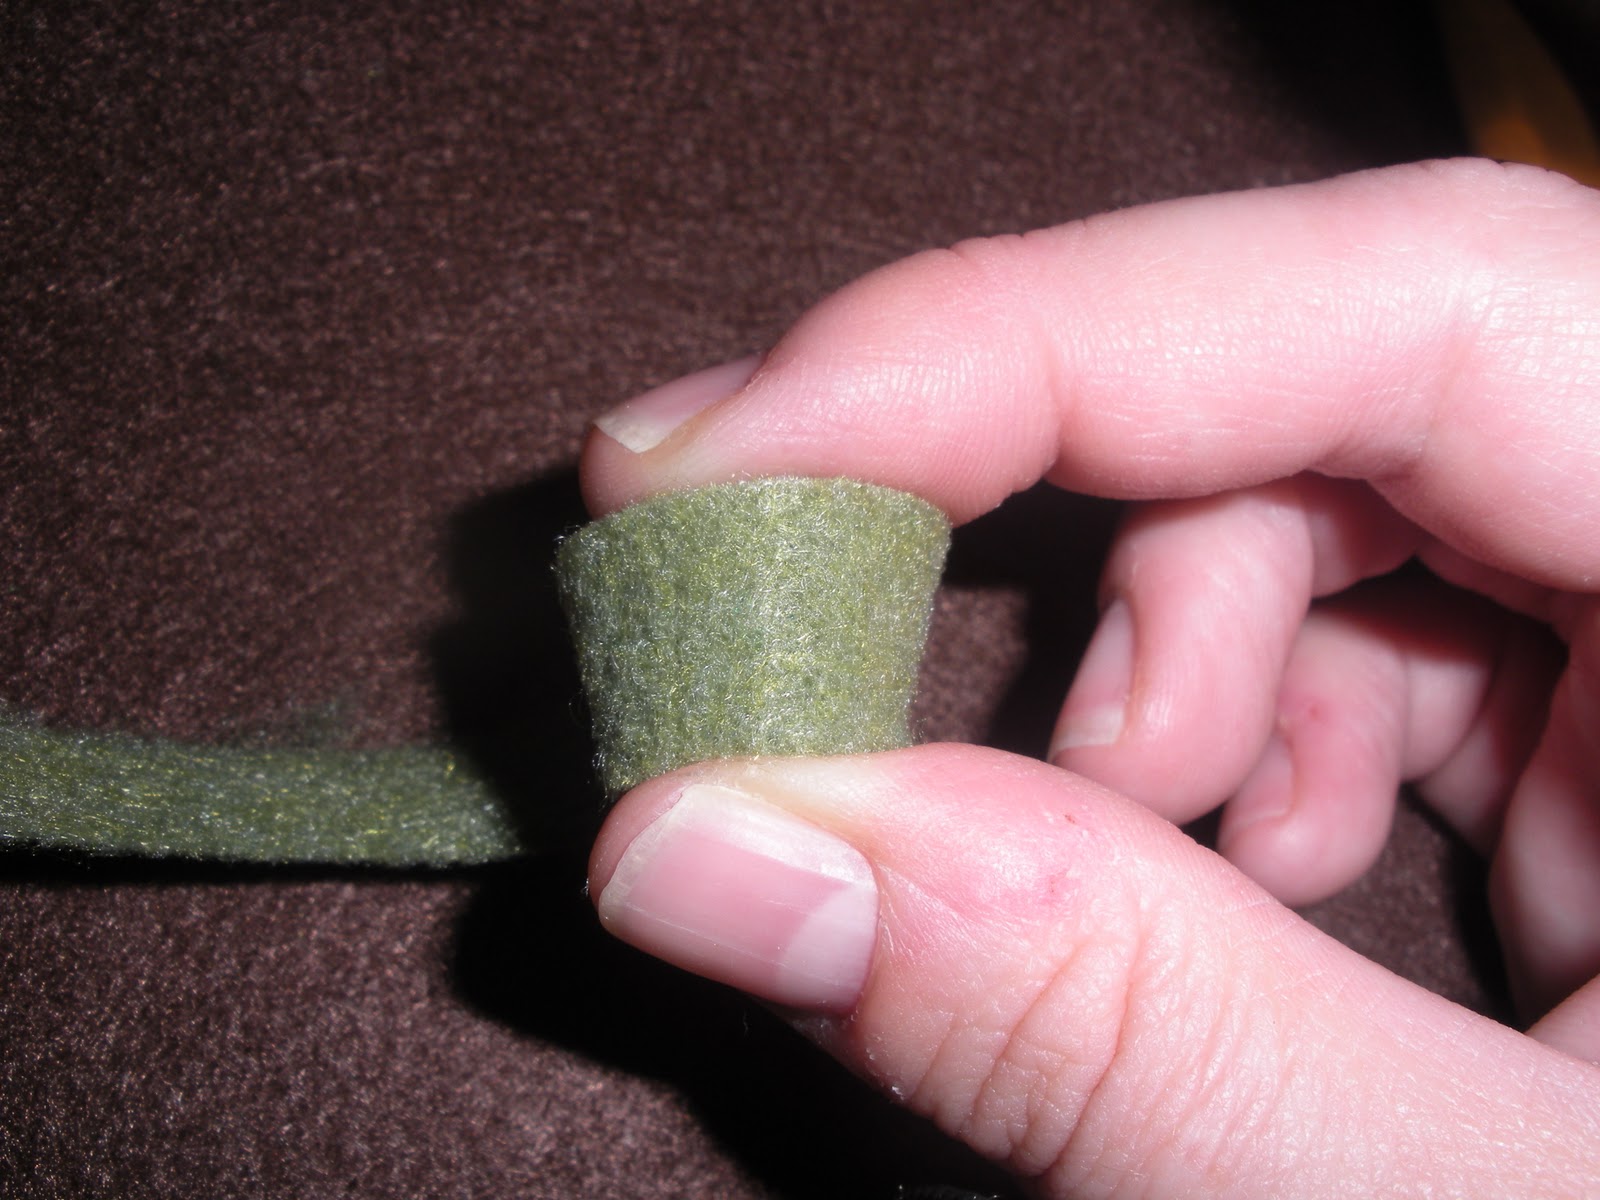
The third flower I tried last night was the rolled felt flowers.  The basic idea is to cut a circle out of the felt (First I traced a coaster, then I tried a CDish plastic piece, which I thought would make bigger flowers, but they didn't really turn out too much bigger.)
 Pencil didn't work super well, but there was a faint enough line (or roughing up of the felt at least) that I was able to cut an almost round circle.
Then I cut the circles like this...

The starting on the outside I rolled the felt pieces up and used my hot glue gun (for the first time!) to secure the end to the bottom.


And wallah!  A beautiful felt flower.    


At this point, my camera battery was pretty much dead.  So I put the battery on the charger while I cut out a few more flowers.  Then I took a pretty maroon one, a scrap piece of green felt that I cut into a leaf and glued them to an alligator clip.  Oh it is so very very pretty.  I played around trying to clip it to a headband (needs a different headband than what I have) and onto my ponytail holder in my hair.  (Liked this look for me, much better than the headband idea).  Then I was struck with Ahhha inspiration and thought how super cute it would be clipped to my fake (very fake) pearl necklace.  But I couldn't find it.  However I did fine it's matching bracelet, which I NEVER wear so I decided to make the bracelet into a necklace.  Once I had gather my materials, my camera battery had charged enough for me to document this project a little. Here are the materials I started with.

(I also decided since my pictures aren't fantastic due in part to lighting issues to try to play around with Picknik and edit my photos a bit, so hopefully from this point on they will be a little nicer, but I didn't have time for all my photos tonight, sorry!)

I cut the bracelet and removed/separated the  beads. 


Then using cream colored embroidery floss I restrung all the beads.  I had more than enough beads to make a long necklace, which worked out great because I like long necklaces and think that the long necklace looks so cute with the flower clip.


With the flower attached to the alligator clip here is the final product! 


 I'm excited to wear it tomorrow to a dinner I'm attending for work!  

This post linked up at


Photobucket


I Heart Naptime

Skip to My Lou