Tuesday, July 31, 2012

Tags

Wow, I have been awfully busy working on craft show/Etsy business stuff lately!    My next (and only my second ever!) show, a Street Fair, with 93 vendors is Sept 16th and I have quite a list of "have to's" and an even bigger list of "want to's" to get done.  I love crafting, and I love building my own business by crafting, but it definitely can be time consuming sometimes, and some of that isn't always fun stuff, but then again, what job is always fun?  :)  In addition to keeping up my tutu stock up and adding some awesome new fall tutus (check them out in my shop or at my newish Facebook page www.facebook.com/amgcrafts- you can even like it to keep up with sales and coupon codes... :) ) I have a variety of other items I'd like to have for the show.  I have never intended for tutus to be my one and only product, even though I love them so much!

But I thought I'd take a break from craft show preps today to post about tags....  Tags (aka labels) to sew into handmade clothing or tags to sew onto handmade blankets or tags to sew onto any other handmade item you want.

My tutu tags/labels


I looked into several options when trying to figure out tags.

1. Print on those pre-made/cut printer fabric sew on sheets...
2. Print directly on fabric...
3. Order from a company that does labels/tags...

I didn't really like any of those options for reasons ranging from cost to time consumption in treating fabrics. Then I remembered a post I read awhile back about using a company that specializes in customized fabric.  (I can't find the original post I read so I must not have saved it, so I apologize for not being able to link to my inspiration)

I'm using Paint & Picmonkey to do this tuturial, because pretty much everyone has it/access to it- but you could use, Gimp, Photoshop, etc.  Whatever photo software you prefer.


Start by opening paint and then going to resize.


Click on the resize by pixels and uncheck the box next to maintain aspect ratio .


Then enter the dimensions you want your tag to be. I ended up using 250 x 112 (If you needed a specific size  some programs allow you to do it by inches and/or millimeters, Gimp which I normally use is one of them) Then save as a JPG.  I saved this as "tag base".  Alternately instead of saving you could use whatever software you are in to design your tag.  I find adding words etc is easier for me in Picmonkey but you might find it an extra step if you excel in Photoshop.


Go to Picmonkey  and upload the file you just saved.  For anyone who has never used Picmonkey, you click on the box that says edit a photo and it will prompt you to upload your file.

Then edit your tag to be however you want it.

I used text to add my wording and I also used to overlays, a heart and my own "logo."


To upload your own logo, go to the overlay tab and then select Your Own from the very top.  This will upload any picture of your choosing in a small size on your current picture (you can resize these too).


This is my finished picture for my tag:


When you are finished, save your file.

NOTE: One thing to account for when you design your tag, is to leave extra blank room around the edges for cutting out your tags and sewing them on.  (you'll see in later on photos an example) 

The company I choose to use to order custom fabric is Spoonflower.  They have $5.00 swatches and shipping for a swatch or fat quarter is only $1.  For my tutu tags I ordered a fat quarter which w/shipping was $11.  I got about 84 tags.  That was .13 a piece.  Obviously its custom though so it did take close to two weeks before my order shipped, if you are in a rush you'll pay more, but there are faster options.

So for the next step go to Spoonflower  (or other custom fabric company of your choice).  With Spoonflower, choose Create.


Upload your file by going first to choose file, then to upload.

Next you will be on the preview page, where you can preview your design... choose your type of material, how you want your pattern to repeat, size of material.

For this tutorial I selected the test swatch which is 8x8.  I would get 40 (usable) tags of this design/size.  See how there is a lot of white space around the text for cutting them out and then sewing them on an item?    


This is an example of forgetting to leave space.  :)  It would be fine if I wasn't sewing them on, so if I was going to use heat and bond or something to iron them on I could fit about 96 on by leaving almost no white space around them.  


Once you received the tags you could cut them out (if you have a rotary cutting tool/cutting mat it would be pretty quick) and sew/iron them on.    Since the tags I'm using for my tutus are only sewn on one side, I used pinking scissors to help keep them from fraying.


Here are a few tag base sizes you can use if you want to try it yourself!
1.5 inch x 3 inch
2 inch x 1 inch

3.5 inch x 1 inch


3.5 inch x 1.5

Have fun making your own...


I usually party at: I Heart Nap Time Skip To My Lou Tip Junkie handmade projects The DIY Dreamer Button pic 9 Seven Alive Photobucket Poofy Cheeks

Thursday, July 12, 2012

DIY toddler dress forms

I have been on a hunt for two months or so for some way to display/photograph my tutu's in a more dimensional way. Since I don't have 24 hour access to any baby/toddler girls I have bought countless "roundish" things from St Vincent's and Goodwill and every time I got the item home and put a tutu on it I just didn't like how it looked. This past weekend I started browsing the internet for toddler size mannequin. Needless to say the most economical ones are still more than I want to spend and 2/3 of the cost is shipping!

A quick look on Pinterest for DIY dress forms came up with a lot ideas for using duct tape and an actual person to make a form. And while I do have a toddler boy around the house something makes me think he would not be still enough to make a duct tape shape of him! However I did see one link for a dress form pin cushion that gave me the idea that I could just try to sew my own form.

 First step was a trip to Walmart (love that it's less than 5 minutes from my house and mine carries by the yard material!) for some muslin (2 yards, 3.98). While I was there I also grabbed a bag of stuffing (3.96ish). I didn't need it, but I way overestimated how much I would use and didn't want to deplete my stash at home (definitely wouldn't have). I also ended up grabbing a 18 month onesie on sale for $1.50.


I laid out the muslin folding it in half twice. If it would've been a patterned piece of material I would have had right sides together... I traced half the onsie on (so I would be more likely to end up with mirrored sides) with a disappearing ink pen.


I cut it out while still folded and laid it out flat to pin.


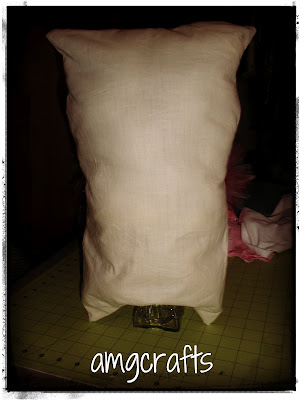
I sewed it leaving about 3 inches open on the bottom, turned it right side out and stuffed it.


At this point I tried a onesie and tutu on it and got really excited, because even though it pretty much just looked like a slightly odd shaped pillow.... it worked almost as well as I wanted it to... now for a base... I happen to live like two blocks from a thrift store so off I went in search of a base. These are the two items I came home with...


For this first dress form I had to go with the glass vase because my bottom opening was not big enough. 

I was excited enough about how it turned out that I made another one up soon after the first. Since I followed no pattern the second one turned out slightly different of course. I left a big enough opening to fit the wooden candle holder in for a base and I actually opted to put some velcro on the hole to help secure it onto the candlestick. I have to go back and do that with the first one, because I like how it works. I can still take the body off the base if I want/need to do something different.

And the finished, dressed products! I think they will work quite well to display some tutus at my next craft show.

I usually party at: I Heart Nap Time Skip To My Lou Tip Junkie handmade projects The DIY Dreamer Button pic 9 These Peas Taste Funny Crafty Scrappy Happy Poofy Cheeks