Sunday, January 6, 2013

Handmade Gifts

Hope everyone had a wonderfully Merry Christmas!    Ours was so busy it passed by even faster than usual.  We had 4 Christmas get together's with different family members from Dec 23rd - Dec 25th and then 3 more up north the weekend before New Years.  And I was frantically finishing up Christmas projects almost right up to each gathering!

Christmas 2011 I did a few handmade gifts but (huge fail) I didn't take a single picture.  Ooops.  This year I did slightly better and got almost everything!

Here it all is...

I actually made three variations of this necklace.  (see still slacking in the picture department!)

I have been LONGING to do a quiet book.  I started a felt doll dress up quiet book last year before Christmas but I got stuck on it and never finished.  This mini quiet book was sort of a last minute decision that I busted out in two evenings.  I can hardly wait to make more.  It was fun and I think it's cute.  And it was a total stash project.  I did not buy a single thing for this, it was all on hand from the ring I used to bind it to the lightweight vinyl for the photo page!

I have been planning a superhero project for my nephew for Christmas for months.  For my little guy for Halloween I made him into a superhero... his name is Hunter and he had a green camo cape with matching mask.  He was a "Super Hunter."  His cousin T thought it was cool so I made him his own superhero outfit for dress up.  It's reversible so it's extra fun!

These were another last minute decision.  I had been browsing Pinterest and saw some t-shirt "rope" infinity scarves.  Shortly after I was working with some fleece remnants I had picked up and noticed that this particular kind of fleece curled very similar to the t-shirt material used in the scarves I saw.  I sewed one up and loved it.  I ended up making a total of 3 for gifts (the third one not shown was the blue and a a dark brown with no buttons) and I have strips cut to make one for myself... someday!

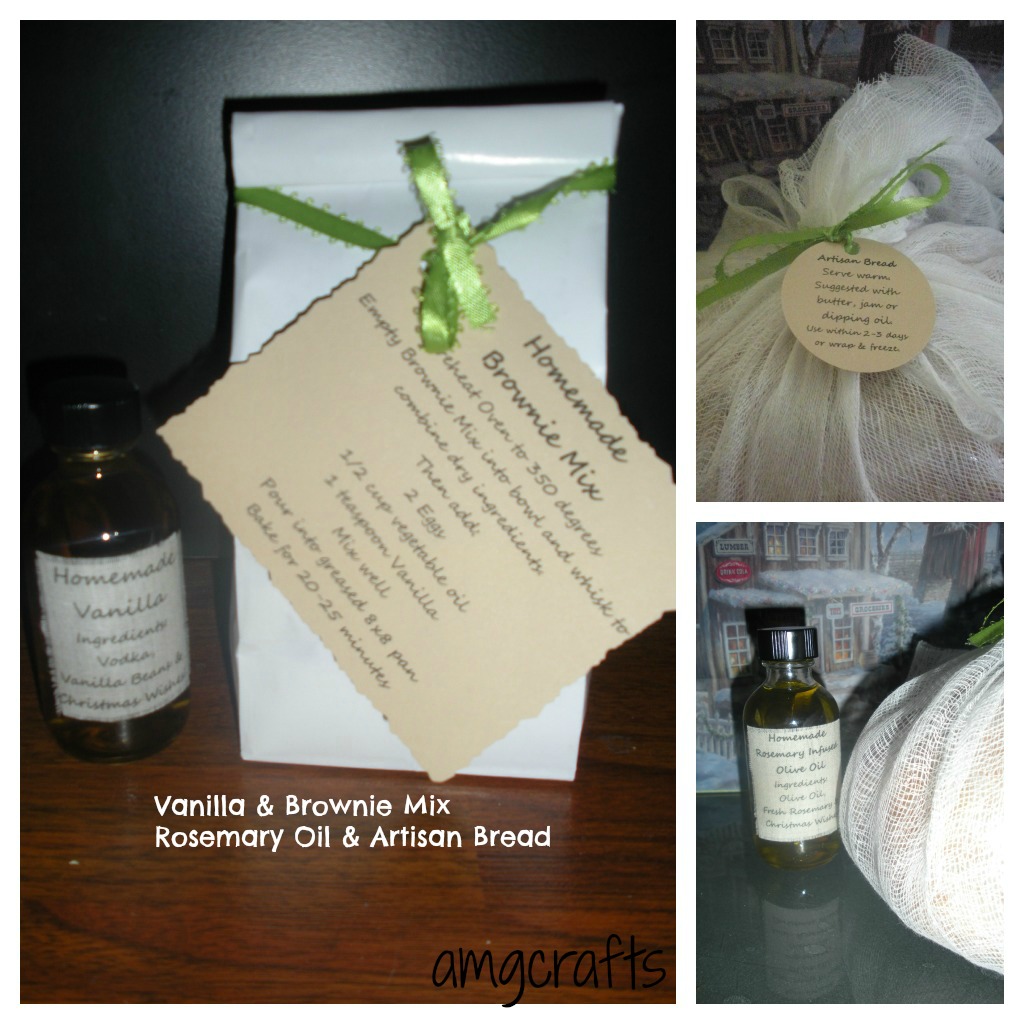
You may have read my fabric labels post...  We gave out about half a dozen rosemary olive oils with homemade artisan bread and about twice as many vanilla's with a homemade brownie mix.  All pinterest inspired.  As a matter of fact, after all my pinterest inspired Christmas crafts, my dear husband decided pinterest was quite possibly useful and now he has an account AND he has used it!  :)

Love those DIY snow globes I've seen.  The person I made this for was my boss at work.  I actually made one the week before Christmas and was putting a finishing touch on it the night before our last day of work and yep, you guessed it, I broke it.  So she had to wait for this part of her present until this past Wednesday since it took some time to dry and she was off between Christmas and New Years.  I actually like this second version better as I thought to use a mirrored candle plate instead of cutting cardboard and trying to perfectly glue it inside.  


Dear Husband's dad can be hard to shop for, and after hearing his tally of DS games which we often buy him or get him gift certificates for (25!) and not getting any helpful hints from him or significant other I decided to make them travel pillows as they do a fair amount of travel.  I actually bought DH one for Christmas so I could use it as a pattern.  They didn't turn out too bad for a first time project by a novice sewer just loosely tracing out the pillow for a patter.  :)  I made removable covers so they could wash the covers.  I made a third one of these for my almost 16 year old cousin who will be traveling to Italy this spring with a class from school.  The third one turned out even better.  


Handmade gifts are time consuming, often stressful (especially if you are a procrastinator like me!) and sometimes a little nerve wracking in this day and age of gift receipts.  But they are also fun and satisfying.  It's very satisfying to put so much thought and love into a gift for someone.  Hopefully everyone who received one of our handmade gifts will enjoy it!


I usually party at: I Heart Nap Time Skip To My Lou Tip Junkie handmade projects The DIY Dreamer Button pic 9 Seven Alive Photobucket

The Chicken Chick

Monday, December 17, 2012

Vanilla & Olive Oil Labels

One of our homemade Christmas gifts this year includes homemade vanilla & homemade rosemary infused olive oil.

We are pairing them with other things, and I'll share some of the "whole gift" photos and details later, but what I really wanted to share today is the super cute labels I made for the bottles.

I found this fabulous pin last week just before I was going to buy printable stick on labels.


It was my first time printing on fabric and let me tell you I was NERVOUS.  I attempted to print directly on wax paper one time after seeing a tutorial about how you could easily transfer words to canvas or wood or something and it was a huge fail for me.  Maybe my printer wasn't the same as in the tutorial but regardless, I was sort of envisioning having to buy a new printer after spray adhesive and fabric going through it....


The fabric I used was a simple muslin, leftover from my DIY toddler dress forms.


I cut a piece of muslin bigger than my cardstock and ironed it.


Then I sprayed my cardstock with Elmers Craft Bond.  I left the cardstock sit for about 5 or so minutes so the craft bond would have a "temporary bond."  Then I spread my muslin over it, smoothing it out with my hands.  I left it to dry for a minute and then trimmed the muslin right up to the edges of the cardstock.


I created my labels in Microsoft Word, using the Labels template and making my own custom size label.  This made it really easy to "fill my page."  In case you've never used this method here it is step by step (Using Microsoft Word 2007).

1. Go to the Mailings tab in your blank document.
2. Go to Labels, a pop up will appear.
3. To make a custom size, go to Options.
4. Select the New Label button
5. Enter your dimensions/number of labels per page.  You might need to do a little math, but it will tell you if your chosen setting won't fit on a page.  For my vanilla I used Height 1.8 and with 1.9 with 3 across and 5 down. I had some leftover room on my page but I was okay with that.
6. Select Okay when you have finished your settings and named your label.
7. Select Okay again.
8. Now in the "Address field" type your desired wording.  To change your font type or size, highlight what you want to change and right click.
9. Select Font.  Make your font changes (size, color, type, bold, italic, underline etc) then click okay.  You will need to do this for each "seperate" change you would like.  For my vanilla I wanted the title larger, so I only selected Homeade Vanilla, changed my font and size, then repeated for the other wording.
10. If you want to change the alignment of your labels (left, center, right) highlight all your wording, right click and select paragraph.  Make your edits and then click okay.
11.  When you have your fonts how you would like them you can do one of two things:
Go straight to print. This will print your label but you won't be able to save the file in case you want to print more later, you will have to do all the above steps again.
or
Select New Document.  This will open another Word file where you labels are all filled in.  Now you can save your file for future use.  You can also make edits to each label one at a time if you want.
12. Print.

After I printed my labels on fabric, I did a little dance of joy that it worked and did not break my printer, yay!  


I let them dry for a few minutes, then cut one out.  It peeled right off the paper.  The fabric wasn't too sticky, the cardstock was still tacky.


I "frayed" my edges a bit (love that look!) then laid my little label down and sprayed it with the craft bond again.  I immediately smoothed it on to my 2 oz bottle (permanent bond).  Then I grinned like crazy because it was SO cute (in my opinion at least) and called my husband to tell him how awesome I am and how Pinterest is the best.  He is now walking around saying in a dramatic voice, "Pinterest is the 4th best thing that every happened to me.."  LOL


Here's our first filled bottles with labels!  Exciting!!!


I usually party at: I Heart Nap Time Skip To My Lou Tip Junkie handmade projects The DIY Dreamer Button pic 9 Seven Alive Photobucket

The Chicken Chick

Monday, December 10, 2012

Ruffled Tree Skirt

Only 14 more crafting (and shopping) days before Christmas, oh my. Really, I should be upstairs in my craft room at my sewing machine or doing something craft-wise. Or out finishing up my shopping but I just had to stop by the blog and share this fun and cute project I finished and gave away.

 My little monkey goes to one of my friends houses a couple of days a week when I go to work. He loves it there and I love sending him there because she rocks. She is also completely nuts about Christmas decorating. She has multiple Christmas trees including a cute little one in her bathroom. So last week she asked if I had any Christmas material she could wrap around the base for a tree skirt. I didn't but I mentioned I had some Christmas-y colored fabric and felt and I'd bring some with this week.

Well, on Friday I got to thinking about those cute burlap ruffled tree skirts I've been seeing on Pinterest. Like this one here.  And I thought, hey why not give it a try?  I had just picked up some cotton in red from the Walmart remnant bin (for like $1.23) and I've had some burlap around for awhile as well as a ton of felt.


So I started off by cutting a circle out of felt, and cut a slit and hole in the middle.  Well, it wasn't a perfect circle but it had the general idea.  :)


Then I cut my burlap & red fabric into strips.


The next step was pinning on the first row of burlap.   I originally thought I was going to hot glue this, but after pinning it I decided sewing it would actually be easier, less messy and hold up much better.


I sewed the first row and then pinned down a row of red so it just slightly overlapped the burlap, sewed it and repeated alternating the red with the burlap.  To make the ruffle just pinch up a bit of the fabric and then lay it sideways, pin and repeat down the row.  If you need to add another strip of fabric just do the pinch and lay it sideways overlapping the edge of your last piece.


I loved how it turned out and even better, was really excited that she loved it!  


I usually party at: I Heart Nap Time Skip To My Lou Tip Junkie handmade projects The DIY Dreamer Button pic 9 Seven Alive Photobucket Poofy Cheeks